 AuroracastUK
Step-by-step reference
Aurora Photography Guide
From first sighting to pro shots. Everything you need to know about camera settings, gear by budget, smartphone tricks, and the habits that separate lucky snaps from stunning images.
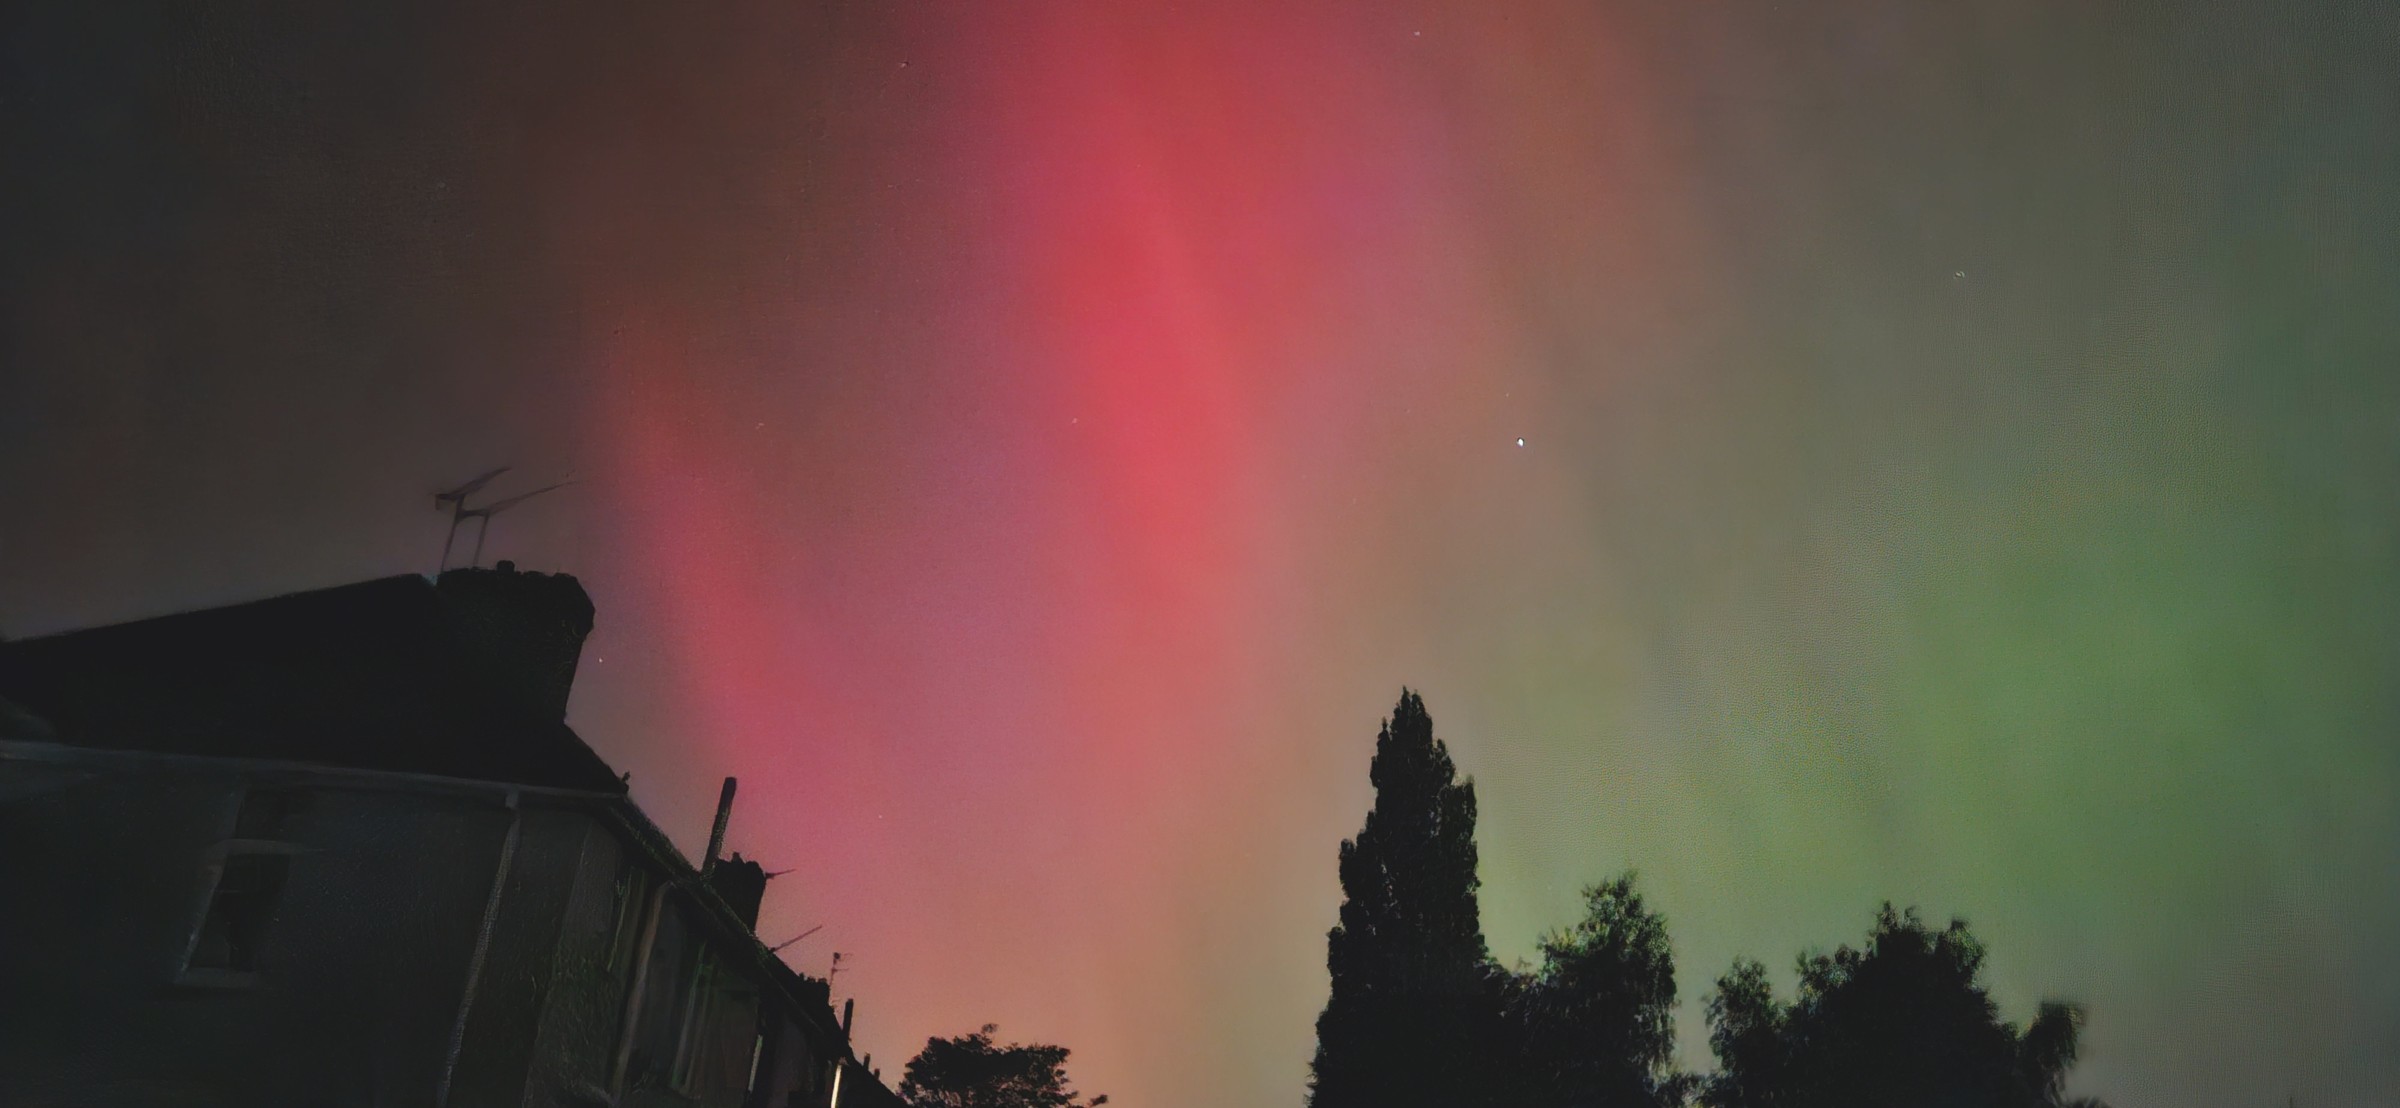
Quick start
Find a dark sky
Drive at least 30 min from town. Open fields, hilltops, or coast, well away from streetlights.
Check the forecast
Hp30 3+ for Scotland, Hp30 5+ for England. Watch Bz. When it goes negative, go outside.
Dress for the cold
Standing still at 2 am is brutal. Thermals, windproof layer, hat and gloves are not optional.
Sky Tonight, your planning dashboard
Before you pack your gear, check the Sky Tonight page for a complete picture of the night ahead. Everything updates to your saved location automatically.
◐Moon phase & illumination
Exact phase, age, illumination %, and next new/full moon. High illumination washes out faint displays.
◉Planets tonight
Which planets are up right now, their brightness and altitude, and when they rise and set.
●Dark sky window
Exact times from astronomical dusk to astronomical dawn, when the sky is truly dark (Sun below −18°). Includes midsummer "no darkness" warning for Scotland.
✦Milky Way visibility
Rise, transit, and set times for the galactic centre. Know exactly when the core is above the horizon.
✧Meteor showers
Active showers with peak date, ZHR (meteors/hour at best), and moonlight interference, so you can plan timelapse sessions around the peak.
▲ISS passes
10-day pass schedule with rise time and maximum elevation. A pass over 45° gives a brilliant streak across 30 seconds of exposure.
◈Noctilucent clouds (NLC)
Shown during NLC season (June to July). These electric-blue clouds appear only around midnight at latitudes above ~50°N.
▦Coming up (sky events)
Meteor peaks, solstices, equinoxes, and other upcoming events, handy for scheduling your next big shoot.
◑Golden hour windows
Morning and evening golden hour times so you can combine aurora hunting with twilight landscape photography.
Timing your aurora hunt
September to March is the best season in the UK. Long, dark nights give maximum viewing windows, and the equinox months (Sep, Mar) see a natural uptick in geomagnetic activity caused by the Russell-McPherron effect.
Hp30 3+ for Scotland and Northern Ireland, Hp30 5+ for northern England and Wales, Hp30 7+ for southern England and the Midlands.
Midnight ± 2 hours is statistically the most active window, though geomagnetic storms can erupt at any hour. Set an alert and be prepared to go out at short notice.
Solar maximum years amplify aurora frequency dramatically. Solar Cycle 25 is near its peak, delivering the strongest storms in two decades, so mid-latitude sightings are far more frequent than usual.
New moon windows provide darker skies and better contrast, making faint arcs far easier to photograph and visible to the naked eye.
Composition, the part the settings cannot fix
Exposure can be corrected afterwards. A crooked horizon and an empty foreground cannot, not really.
Get the horizon level
A tilted horizon is the quickest way to make a good shot look like a snapshot, and it is the first thing an experienced eye notices. Turn on your grid or electronic level and line up the horizon rather than the aurora, which moves. You can straighten it afterwards, but every degree of rotation crops away sky you went out to photograph.
Give the sky something to stand against
A silhouetted tree, ridge, church tower or stretch of coast gives scale and turns a photograph of the sky into a photograph of somewhere. Without it, even a strong display can look like a green smear. Scout the foreground in daylight, because at midnight you cannot see what you are standing in front of.
Leave the aurora room to grow
When activity is low the arc sits on the northern horizon, so keep the horizon in the frame or you will photograph black sky. When it strengthens it climbs, sometimes overhead, so give it more sky than feels right and crop later rather than cutting the tops off the rays.
Settings Calculator
Don't have a camera? Your phone can capture aurora too. Start here.
Smartphone tips
iPhone: Use Night mode or the ProCamera app. Keep it still, propped against something solid.
Android: Use Pro mode → set ISO 1600, shutter 10 s. Pixel phones: try Astrophotography mode in Google Camera.
Camera / sensor
Focal length (mm)
Star trail limit: 2 s
Aurora activity
Recommended settings · Active (Hp30 3 to 4)
ISO
800 to 1600
Shutter
3 to 8 s
Aperture
Max open
iPhone Night mode or Pixel Astrophotography mode work well here. Disable portrait mode.
These are starting points, and real conditions vary. Bracket your exposures and review on-screen after every shot.
Just starting out?
You don't need expensive gear to photograph the aurora. A modern smartphone works brilliantly, and many of the best shots you'll see online were taken on a phone. Start with what you have and upgrade only if you want to.
- Smartphone with Night / Pro mode
- Mini tripod or GorillaPod
- Warm, waterproof layered clothing
- Red-light head torch (preserves night vision)
- Flask of hot drink
- Fully charged power bank
Modern smartphones can capture aurora surprisingly well. The key is keeping the phone perfectly still.
- Entry mirrorless or DSLR (Sony ZV-E10, Nikon Z30, Canon M50)
- Wide kit lens + 50mm f/1.8 prime
- Solid travel tripod with ball head
- Spare batteries, because cold drains them fast
- Remote shutter app or wired release
- Microfibre lens cloths for condensation
A crop-sensor mirrorless with an f/1.8 prime is a huge leap from a smartphone and fits in a day pack.
- Full-frame mirrorless (Sony A7C II, Nikon Z6 III, Canon R6 Mark II)
- Ultra-wide fast prime (Samyang 14mm f/2.8, Sigma 14-24mm f/2.8)
- Carbon fibre tripod, light to carry and stable in wind
- Intervalometer for automatic timelapse
- Lens dew heater + USB power pack
- Astro-modified sensor or clip-in Hα filter
Full-frame sensors capture far more light and dynamic range, which matters for fast-moving curtains at low ISO.
Stars and aurora on an iPhone
This section is for iPhone. There is an Android one directly below it. You do not need to install anything: the Camera app that came with the phone will take a good photograph of the aurora, and the whole job is giving it darkness, stability and something worth pointing at.
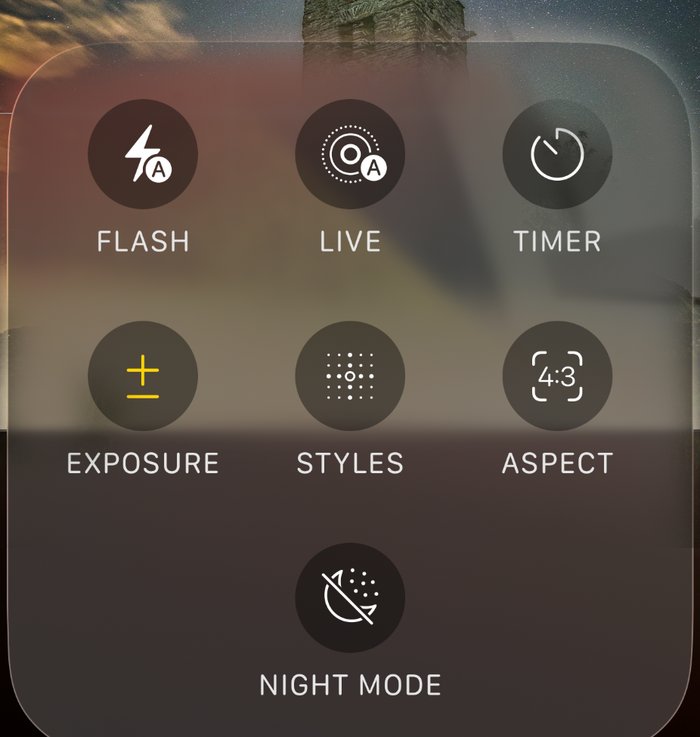
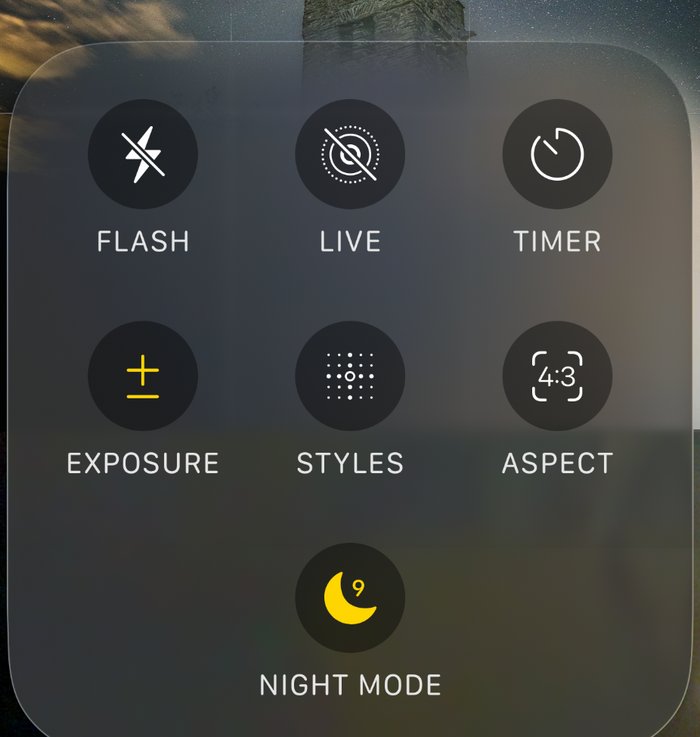
Screenshots by Jonny Gios
Set the phone down
A small tripod with a phone clamp is ideal. Night mode gathers light over several seconds and needs the phone completely still for all of them, so a wall or a gatepost will do at a push. Handheld will not.
Open Camera and choose Photo
Point it at the part of the sky you want. Give the lens a wipe first, because a fingerprint puts a soft haze around every bright star and streetlight.
Stay on the main lens
Use the 1x camera. Digital zoom throws detail away rather than adding any, and the main lens gathers the most light of the three.
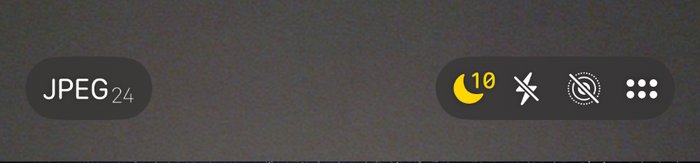
Wait for the Night mode moon
In low light the moon icon appears on its own. Yellow means Night mode is switched on. If it never appears, it is not dark enough yet, which is the usual reason an early evening attempt comes to nothing.
Choose the longest time offered
Tap the moon and drag the slider to its maximum. How long you are offered depends on the model and on how dark and how steady the scene is, so it will not always be the same number.
Turn the flash off
It lights nothing at that distance and destroys the darkness you drove out for, along with your night vision.
Leave exposure at zero to begin
Raise it a little if the sky comes out too dark. Lower it if light pollution washes everything to grey.
Put something in the foreground
A building, a tree, a ridge. A frame of bare sky rarely holds up, however good the display was.
Press the shutter, then let go
Do not touch the phone again until the countdown finishes. If the clamp wobbles when you tap, use the timer so your hand is well clear before it starts.
Take several
The aurora changes constantly. One frame will often have far better structure than the one taken thirty seconds earlier, and you cannot tell which on a small screen.
Aurora is not the same as stars
Stars reward the longest exposure the phone will give you. The aurora does not, because it moves. Hold the shutter open too long on a fast display and the curtains average out into a soft green wash with no structure in it. Start somewhere around 3 to 10 seconds and only reach for a longer setting when the display is faint and slow.
If the photo is not working
If you outgrow the Camera app later, NightCap and Photon both add manual control. Neither is needed to get a good photograph tonight.
Stars and aurora on an Android phone
This section is for Android phones. The iPhone one is directly above it. Almost every Android phone has a night mode built into its camera, and it will do a good job on the aurora without you changing a single setting. Find yours first. Manual settings are further down and are only worth reaching for once the automatic one has let you down.
Where your night mode lives
Google Pixel
Night Sight turns itself on when the scene is dark, and appears in the list of camera modes. Rest the phone on something solid and it offers a much longer astrophotography exposure, which is the one you want for stars.
Samsung Galaxy
Night mode sits in the camera modes. The separate Expert RAW app, free from Samsung, adds an astrophoto mode built for exactly this.
Anything else
Open the camera and look through the mode list for Night, Night mode or Pro. Almost every phone sold in the last few years has one of them.
Set the phone down
A small tripod with a phone clamp is ideal, and a wall or a gatepost will do. Night modes gather light over several seconds and need the phone still for all of them.
Find your night mode
Use the one your phone already has before reaching for anything else. It does the difficult part for you, and it is tuned for that particular camera.
Stay on the main lens
The 1x camera gathers far more light than the ultra wide or the zoom. Avoid digital zoom, which throws detail away rather than adding any.
Turn the flash off
It lights nothing at that distance and ruins both the shot and your night vision.
Put something in the foreground
A building, a tree, a ridge. A frame of bare sky rarely holds up, however good the display was.
Press the shutter, then let go
Do not touch the phone until it has finished. If tapping the screen shakes it, use the timer so your hand is clear before it starts.
Take several
The aurora changes constantly, and you cannot tell which frame caught it best on a small screen in the dark.
Aurora is not the same as stars
Stars reward the longest exposure your phone will give you, which is why astrophotography modes run for minutes. The aurora does not, because it moves. Hold the shutter open too long on a fast display and the curtains average out into a soft green wash. On a lively night, use the ordinary night mode rather than the astro one.
If you want to take control
- Pro or Manual mode. Only worth it once the automatic night mode has let you down. It hands you the settings below.
- Exposure time. 3 to 8 seconds. Longer when the aurora is faint, shorter when it is moving quickly.
- ISO. 800 to 1600. Higher on a faint night, lower if the picture looks grainy.
- Focus. Set it to infinity by hand if you can. Autofocus hunts in the dark and often gives up on something closer.
- Portrait mode. Off. Its background blur will smear the sky.
If your camera has no Pro mode, ProShot and Manual Camera both add one.
Habits that separate great shots from missed ones
Face north
In the northern hemisphere, aurora forms around the magnetic pole. Face north and scan the horizon upward.
Let your eyes adapt
Stay away from white light for at least 20 minutes. Your night vision can improve for up to 45 minutes. Use a red torch only.
Check the Hp30 forecast before going out
No point driving an hour each way for Hp30 1. Aim for nights when Hp30 4+ is forecast and the skies are clear.
Shoot RAW
RAW files retain far more detail in highlights and shadows than JPEGs, giving you much more latitude in post-processing.
Focus on infinity using a bright star
Set your lens to manual focus, zoom in on a bright star in live-view, and adjust until it is a sharp pinpoint. Lock focus there.
Shoot toward the horizon for low Hp30
At Hp30 3 to 4, the aurora arc hugs the northern horizon. Pointing straight up will give you black sky; keep the horizon in frame.
Bracket your exposures
Shoot the same scene at two or three different shutter speeds. Aurora brightness can change second to second.
Watch Bz, not just Hp30
Hp30 updates every 30 minutes. Bz updates every minute. A sudden southward Bz spike can produce aurora 30 to 60 minutes before Hp30 catches up.
Set white balance manually
Set white balance to around 3500 to 4500 K. Auto white balance will try to neutralise the aurora's natural green and pink tones, so lock it manually to preserve the colours.
Intervalometer for timelapse
Use a remote shutter or intervalometer to take a series of shots without touching the camera. 10 to 15 seconds at f/2.8, ISO 1600 is a good timelapse starting point.
Cold kills batteries, so come prepared
Keep a spare battery in an inside pocket. Moisture condenses on front elements; a lens hood helps, and a hand warmer near the lens barrel prevents dew.
Noise reduction in post
Lightroom, Darktable or similar: luminance noise reduction of 40 to 60 is usually enough. Avoid going too high or you'll lose star detail.
Patience is the key setting
Aurora often intensifies suddenly and fades just as quickly. Be set up and ready before activity peaks. The best shots go to those already outside with the camera on a tripod.
Badges are awarded automatically as you participate in the Auroracast community. They appear on your profile and in the community sidebar.